Do you ever get jealous of those users with awesome, unique Neoboard fonts? Have you tried to make your own font, only to have it turn out looking like a piece of dung? Well, this guide is here to help! Learn how to create your own personalized NeoFont, tailored to your exact specifications.
In this comprehensive guide, we’ll cover the basics of font creation, explain the essential terminology, walk you through the process step-by-step, and reveal some secret techniques to help you stand out. After reading this, you’ll have no excuse for a boring font! So, what are you waiting for? Let’s dive in!
Introduction
NeoFonts allow you to personalize your posts on the Neoboards, making them visually appealing and unique. By using NeoHTML tags, you can customize your font’s color, size, style, and more. This guide will equip you with the knowledge and tools to create stunning NeoFonts that will impress your fellow Neopians.
Glossary of Terms
Before we begin, let’s familiarize ourselves with some key terms:
- Avatar: The image to the left of your Neoboard post.
- Chat Smile: Small images used in posts to express emotions.
- Font: The style and appearance of your text.
- Hex Code: A six-digit code representing a specific color.
- NeoHTML: Neopets’ version of HTML used for formatting Neoboard posts.
- NeoTitle: The short phrase under your username on the Neoboards.
- Siggy: Any material following your message on the Neoboards (also known as a “signature”).
- Siggy Line: The line separating your message from your signature.
- Siggy Pet: An image created using characters, usually found in a siggy.
- Tags: Commands enclosed in brackets that affect the text within them.
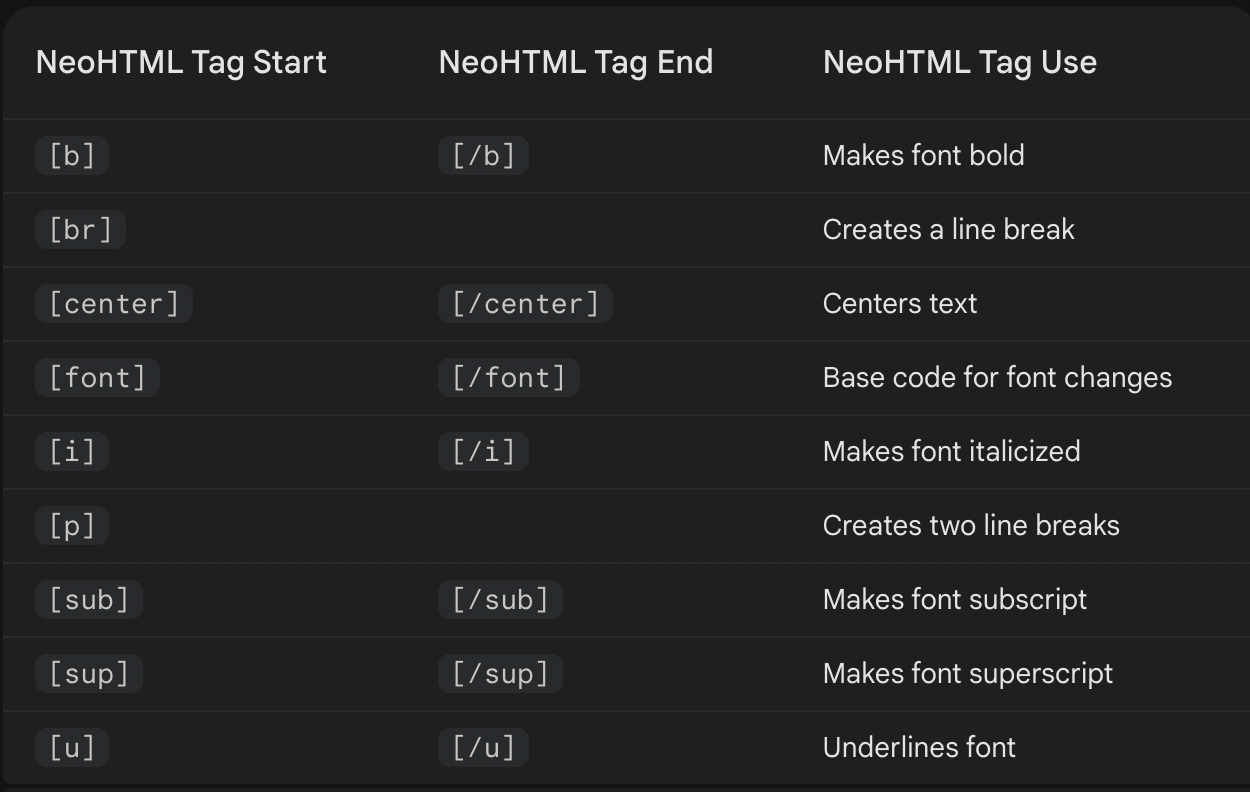
NeoHTML Tags
NeoHTML tags are the building blocks of NeoFonts. Here’s a list of essential tags:
Font Extensions
These extensions are used within the [font] tag to modify the text:
c={Color Name or '# + Hex Code'}: Changes text color.
s={Size}: Changes text size.
f={font name}: Changes font style.
NeoHTML Fonts
Neopets offers a variety of font styles to choose from:
| Font Name | NeoHTML |
|---|---|
| Arial | Arial |
| Castellar | Castellar |
| Fantasy | Fantasy |
| Georgia | Georgia |
| Harrington | Harrington |
| Impact | Impact |
| Jokerman | Jokerman |
| Mistral | Mistral |
| Onyx | Onyx |
| Papyrus | Papyrus |
| Patrick | Patrick |
| Rockwell | Rockwell |
| Sydnie | Sydnie |
| Stencil | Stencil |
| Storybook | Storybook |
| Sylfaen | Sylfaen |
| Symbol | Symbol |
| Tahoma | Tahoma |
| Verdana | Verdana |
Export to Sheets
Note: Some fonts may not display correctly on all computers.
Chat Smilies and Emoticons
Liven up your posts with chat smilies:
| Chat Smile Image | Chat Smile Code |
|---|---|
*dung* | |
*catfish* | |
♥ & &hearts | |
♦ & &diams | |
♣ & &clubs | |
♠ & &spades |
Export to Sheets
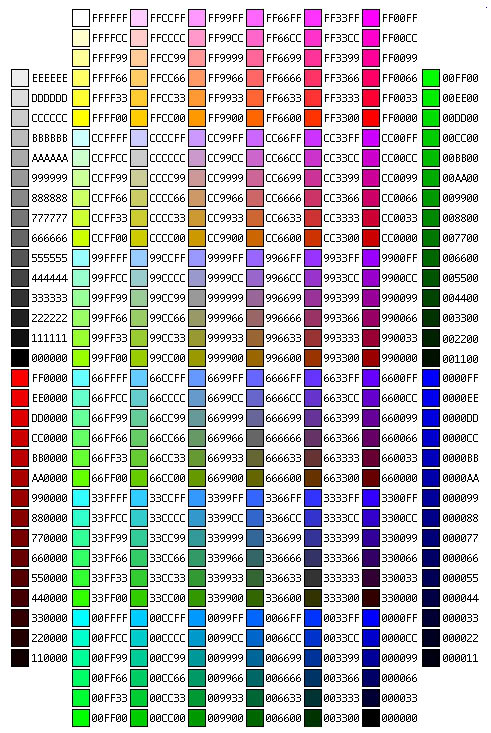
Hex Code Chart
Hex codes allow you to use a wider range of colors. Remember to add # before the code for it to work. You can find hex code charts online or use image editing software to identify specific colors.
Step-by-Step Guide
Step 1: Choose Your Avatar and Colors
Select an avatar from your Chat Preferences. Each avatar has a set of colors associated with it. You can use the English names for common colors (e.g., Red, Blue) or find the corresponding hex codes using a hex code chart or a website like avatar.starried.net.
Step 2: Understand NeoHTML Tags
NeoHTML tags work in pairs to modify the text between them. For example, [b]This text will be bold[/b]. Make sure to use the correct opening and closing tags.
Step 3: Inserting Symbols
To add special symbols to your font, use a word processor like Microsoft Word. Go to “Insert” -> “Symbol” to browse and select the desired symbols. Then, copy and paste them into your font code.
Step 4A: Creating Pretext
Pretext appears before your main message. Create your pretext and use [br] or [p] tags to add spacing between it and your message.
Step 4B: Creating Borders
Combine pretext and your siggy to create borders around your message. Use symbols to create the border design. For example:
[center]╔═○═○═○═╗[br]NEOHTML[br]╚═○═○═○═╝[/center]
This will create a simple border around the word “NEOHTML”.
Step 5: Message Font
Customize the appearance of your main message using NeoHTML tags. Experiment with different font styles, colors, and sizes.
Step 6: Create Your Siggy
Combine the techniques from previous steps to create a unique siggy. Mix colors, fonts, and symbols to personalize your signature.
Step 7: Compacting Your Font
Neopets has character limits for font and siggy codes (120 characters each). If your code exceeds the limit, try to compact it by:
- Removing unnecessary spaces.
- Using English color names instead of hex codes when possible.
- Removing redundant font tags.
Getting Rid of that Siggy Line/Adding Your Own
- Remove the Siggy Line: Add a space () at the end of your font code and another space at the beginning of your siggy code.
- Add a Custom Siggy Line: Use the following template:
Font Code: PUT YOUR FONT CODE HERE [br][br]PUT YOUR SIGGY LINE HERE[ Siggy Code: ]PUT YOUR SIGGY HERE
Making Text Invisible
Warning: Using invisible text to hide content in your main message is a warnable offense. However, you can use it for stylistic purposes in your siggy.
Since Neopets has blocked #FFFFFF and “White”, use #FFFFFE to make text invisible.
Example: [font c=#FFFFFE]This text is invisible[/font]
Making Rainbow Fonts
To create a rainbow effect, break your message into smaller sections and apply different colors to each using NeoHTML tags.
Example:
[font c=#0000FF]Be[/font][font c=#0000EE]ho[/font][font c=#0000DD]ld[/font] [font c=#0000CC]th[/font][font c=#0000BB]e m[/font][font c=#0000FF]ag[/font][font