Tangor’s Workshop is located in Moltara, a massive underground city of magma-filled caves located deep beneath the surface of Neopia. Discovered during the events of the Atlas of the Ancients plot, Moltara offers an assortment of fire-y delights for explorers, including Tangor’s Workshop itself!
Within his Workshop, Tangor can take the odds and ends of Moltara and turn them into a series of wonderful petpets for you to enjoy! When standing in the workshop, the available items that you have in your inventory are displayed in order to be clicked and turned in to Tangor for him to cobble together. Luckily, there are only four items that you need to be concerned with when it comes to Tangor: Shiny Obsidian, Miscellaneous Gears, Scrap Metal and Stone, and Red Moltite. Although visiting the workshop prompts you to trade any and every item in your inventory, (almost) all but these four can be ignored, as they do not lead to the creation of any petpets in Tangor’s Workshop. The exception to this is that Tangor will also build special combination petpets by combining the basic petpets that he makes from these four items. A list of valid item combinations is located at the end of this guide for your convenience.
Although these four items can be purchased from other users, they can also be found within the city limits of Moltara, either by visiting certain locations or completing mini-quests!
GATHERING THE ITEMS AT TANGOR’S WORKSHOP
SHINY OBSIDIAN
Shiny Obsidian is undoubtedly the easiest of the four items to obtain, as you can collect one per day merely by visiting the large Obsidian Quarry located in the lower left-hand corner of Moltara’s city map. It does not have a map label like the other locations, but can still be accessed by clicking the black rocks along the city’s edge.
MISCELLANEOUS GEARS
The Miscellaneous Gears appear at random on the Moltara City map. If you do not see any on your current view of the city, refresh the page often until they appear. There are eight known spawning locations for the gears:
- Front door of Lampwyck’s Shop
- By the large bank vault
- Roof of Molten Morsels
- Roof of Town Hall
- Roof of Cog’s Togs
- Front of Town Hall
- Just under the string of red lights in the center of the map
- Between Cog’s Tog’s and Town Hall
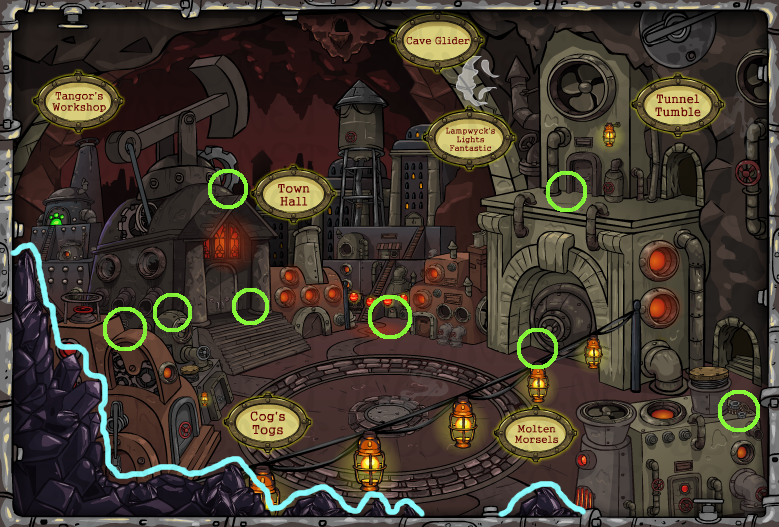
A rough guide to Miscellaneous Gears spawning locations.
SCRAP METAL AND STONE
Scrap Metal and Stone is awarded by a random event occurring in Moltara City. Simply refresh the map until the event appears, and the scrap will be added to your inventory.
RED MOLTITE
Red Moltite is the hardest of the four items to obtain, requiring you to complete not just one, but two mini-quests in order to find it. First and foremost, you must finish the Worm Lantern quest. To begin the quest, visit Lampwyck’s Lights Fantastic. The first time you visit, and any time after that in which you visit without having an empty lantern, an event will occur:
Once you have an Empty Lantern, you will be able to go out into Moltara City and the Moltara Caves and collect the ten Worms that loiter around these two areas. You may have seen a worm or two as you have refreshed the map looking for gears and scrap – each of the ten worms has a specific respawn point that they will always appear in – but click fast! A worm is not guaranteed to be there just because you see its picture on the map. The locations of the worms are known to change approximately every five minutes, so if they change before you have a chance to capture it, it will return an error message when you attempt to capture it.
The locations of the ten worms and their colors are as follows:
Moltara City
- Red: Left of Town Hall
- Orange: Center, between orange lanterns
- Green: Roof of Cog’s Togs
- White: Entrance of Bank Vault
- Rainbow: Entrance to The Caves
Moltara Caves
- Purple: Ledge above Magma Pool
- Pink: Just below Magma Pool
- Yellow: Path above Petpetorium
- Blue: Next to Petpetorium stairs
- Black: Doorway to the right of Petpetorium sign
With enough refreshing and enough patience, you will collect all ten worms. Once the ten worms and the empty lantern are all in your inventory, select the lantern in your inventory and select ‘Fill it with worms’ from the dropdown menu. The ten worms will be consumed and the empty lantern will become a Brightly Lit Lantern!
With this new item, you can successfully navigate the Dark Cave and explore its labyrinthine contents. Entering the cave with a lit lamp allows you to venture down a series of paths in search of Red Moltite. The correct path is dependent on the bolded sentence that greets you when you first enter the cave with a lit lantern. Each of the sentences has its own solution. For speed and ease of reference, a collection of the correct inputs follows – The bolded words are the beginning of the applicable starter sentence, and the four letters that follow are the correct combination of Left and Right turns that will get you to the Red Moltite:
At least… RLRL
Does it… RLLL
Hello? LLRR
I hope I… RLLR
I hope there’s… LRRR
I should… RRRL
I sure… RRLL
I wonder… LLLR
It’s very… LLRL
Jordie… LRLR
Let’s go… RRRR
Look at… LRRL
This lantern… RLRR
What a… LLLL
Where does… LRLL
Which way… RRLR
Collecting Red Moltite can be done once per day – after you have successfully collected a piece from the cave, your lantern’s worms will get tired and cease to glow. In order to reset your lantern for the next day, you must return it to Lampwyck’s shop when the worms get tired. Lampwyck will nurse your worms back to health for tomorrow… or will he? Upon returning, you find out that he has accidentally allowed them all to escape! He returns the empty lantern so that you may catch them all again in the wilds of Moltara, effectively resetting the quest to the beginning.
PUTTING IT ALL TOGETHER
Depending on what you are interested in building at Tangor’s workshop, you should collect the necessary supplies either by purchasing them from other users or by completing the sidequests above. Once you have obtained all the parts that you need, click them one at a time to add them to the recipe. When you are finished, click the first button to turn the items into Tangor so he can build the resulting petpet. If you make a mistake, there is a handy reset button, as well!
RECIPES
 |
Dal: Obsidian + Scrap |
 |
Oop: Obsidian + Gears |
 |
Ada: Scrap + Gears |
 |
Val: Obsidian + Moltite |
 |
Rav: Gears + Moltite |
 |
Goy: Scrap + Moltite |
 |
Gio: Obsidian + Gears + Scrap |
 |
Albot: Obsidian + Scrap + Moltite |
 |
Teek: Obsidian + Gears + Moltite |
 |
Erge: Scrap + Gears + Moltite |
 |
Nik: Obsidian + Scrap + Gears + Moltite |
Petpet Combos
 |
Daloop: Dal + Oop |
 |
Adagio: Ada + Gio |
 |
Raverge = Rav + Erge |
 |
Valteek = Val + Teek |
 |
Goyalbotnik = Goy + Albot + Nik |
 |
Vaggendotra 5000 = Daloop + Adagio + Raverge + Valteek + Goyalbotnik |
NOTES
- Due to the highly random nature of events and item spawns required to gather the raw materials for constructing petpets at Tangor’s Workshop, it may be advisable to purchase the components cheaply through the Shop Wizard instead and get right to building!