Neopets Mootix Drop

Neopets Mootix Drop is the perfect game to start your day with because it’s such an amazingly fun game where you have a Mootix dropping in parachute and all you have to do is to control it until it reaches its target, meaning after landing on it. In Mootix Drop one should be prepared to do the necessary work in order to win all of the rounds in all the difficulties.

How to Play Mootix Drop

First of all, make sure you know about the game modes. There is two modes: the first one is the Mission mode where you actually have to complete multiple levels during the game and achieve what is being asked from you. The second is the Single Drop mission where you will have to collect all rings from the sky when you will be dropping. The minimum number of the rings you will successfully have to pick during a game depends on it’s difficulty. This subject will be brought back later but know that there is three difficulties. The first one is easy, the second one is medium and the last one, hard. The rings you will have to pick depends of it. So the harder the game is, the more challenge you will have and the more you will be in a situation where you will have to prove yourself worthy.

Mootix Drop Gameplay

So basically at the beginning it might look an easy game because all you have to do is to press with arrow keys. That’s right, the left, right, up and down arrow keys will be all what you need. The number of points granted for entering a circle (ring) is two and if you enter exactly in the center then these points will be doubled, granting you a total of four. Aiming the center is good for people who try to achieve high scores for trophies and challenges. Here is a picture that will give you a simple idea of the gameplay and what you will have to encounter during the game.
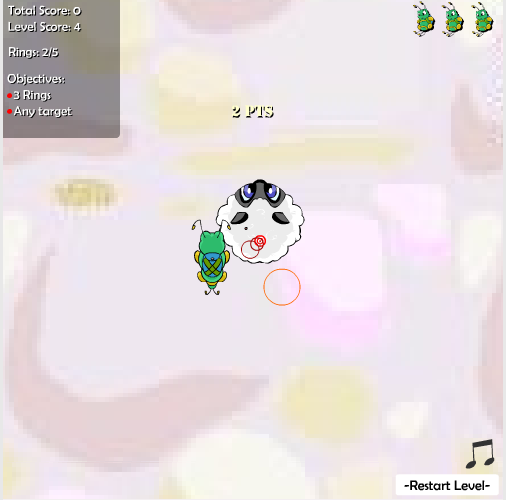
Mootix Drop

So basically the first list indicates the score you achieved until now (remember, the more you aim the center, the better because it doubles your points), then comes the level you got until the current round only. After that you will see the total number of rings you successfully got into during the round / the amount of total rings that will show up during the round. So how do you know how many rings you will need to enter into? The objectives is the indicator you will have to follow. For example, in the picture above it says 3 rings. In other words, you will have to successfully enter three rings (not necessarily in the center of it) to get the first achievement completed. However there is more than one. Again, in the picture above it says any target. That means you can decide to land on the red and white target or the small ones. The level difficulty the game is currently showing is easy. You have to complete it to access the medium level and then complete that level to access the hard one. In hard mode, the number of rings you can miss in one round will be very slim to none and the target will be the smallest one.

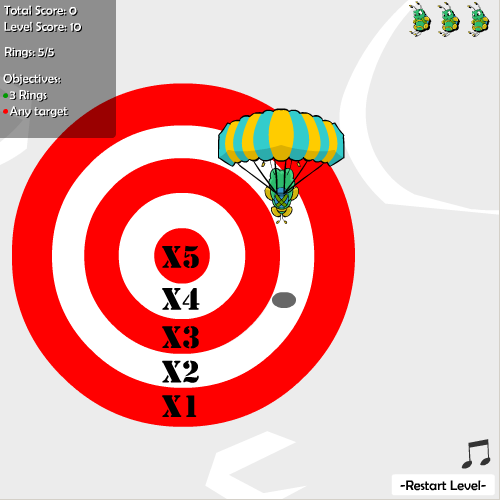
As you already know, the Mootix will be dropping and encountering rings. The question is what happens when there is no more rings? How am I supposed to know where to land in a manner of a fraction of second? Rest your mind, when there is no more rings, the parachute of the Mootix will open. Try to aim the most you can of the center of the target. You guessed right, the center grants you more points. The score from the rings will also be multiplied by the multiplier to get your level score. Be aware that the smaller targets will offer you with higher multipliers than the bigger target. You will notice that when you’re doing missions, you are not actually landing on the floor, you are landing on a petpet’s picture.

Mootix Drop Neopets

Neopets Mootix Drop Cheats

While you are playing, you can do many combos and game codes to do some random funny stuff. For example: if you, the Mootix get a Spyder plus a target you will start to drop extremely fast.

Before you start a level, there will be a screen telling you the petpet you are currently on. At this time, press up and down. Then, at the bottom right corner you will see an icon. You can use the down key to change the current icon available in the said column, right arrow key and left arrow key if you want to change columns. The combinations described below, well, some of them are very fun indeed but note that if you attempt to enter a code it may not always work. The game is old and glitchy so it may not work all the time.

Spyder + Target + Mootix = The Mootix will start going super fast
Babaa + Mootix + Spyder = The Mootix will become very huge
Babaa + Target + Spyder = The Mootix will become way slower, but you will be granted with 5 start points
Mootix + Target + Babaa = the Mootix will become invisible (it is just for appearance)
Mootix + Target + Mootix = The Mootix will become super tiny
Mootix + Target + Babaa = The game will be turned upside-down becoming extremely difficult to follow and will grant you a total of 10 points at the start of the game. It is not really worth it as you will have a hard time completing missions.
Target + Spyder + Target = It will turn your dropping Mootix into a Spyder for a nice looking appearance and you will get a 8 point head start.
Spyder + Target + Target = You will start with 8888 points and with rings worth 1000 points (doubled, meaning 2000 for the center) but when you get into parachute mode, you will never reach the target because you will keep flying and you can expect an endless level. False hopes, eh?

Finally, there is, as always, three types of trophies. Even if the game is somewhat easy, you will have to know that if you are going after the golden trophy, you will need lots of efforts and practice. The reason behind that is that you will have to always try your best in the hardest difficulty and almost always getting in the center of the rings. Be prepared. As always, the beginning of the month is the best if you’re looking for these shiny trophies.

https://neopets-cheats.com/wp-content/uploads/2016/04/396_3.png https://neopets-cheats.com/wp-content/uploads/2016/04/396_2.pnghttps://neopets-cheats.com/wp-content/uploads/2016/04/396_1.png

So what are you waiting for? Start playing! GO!
Mootix Drop

Neopets Word Poker

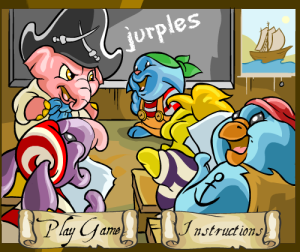
Are you a grammar nazi or just an amazing speller? If so, this Word Poker is the perfect game for you! Captain Roundhoof’s training school on Krawk Island (yes the same place you would go to train your neopet) is now accepting new students, and this here the study guide that will never let you fail!

Word PokerWord Poker Basic Instructions

There are a total of 6 rounds in Word Poker. At the start of each round you are given 8 letters (the letters will vary from round to round) from which you will have to make as many words as possible within the allotted time (60 seconds per round). Words have to be AT LEAST  3 letters each and must use the letters you are given. Additionally you can only use the letter the number of the times it appears-if you are given only 1 letter “A” you can only spell a word with one “A” in it. However the letters may be used in as many words as you can think of during that round.

Word Poker Controls

The controls in Word Poker are simple, you use your keyboard to type the words and then you press “enter” (you can use either the in game button or the button on the keyboard). If the word is acceptable and has not yet been used, the word will clear and be added to the list on the bottom right. This game will only accept words used in the Neopian Dictionary (NO PROPER NOUNS ALLOWED), so no making up words! There is no penalty for guessing a wrong answer, other than losing time for trying the word!word poker neopets

With the above letters you could make the words “been” “bee” or “con” but you could not use the word “Ben” because it is a proper noun (name).

Word Poker Scoring

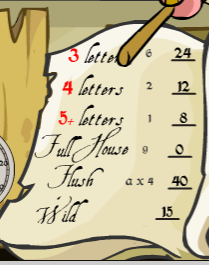
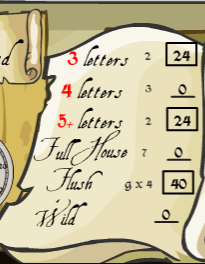
At the end of each round you will be asked to choose one of the following categories to take points for. Each category can only be used once per game so pick wisely. The images below show the options once you’ve completed a round. The one on the left shows the first round, where you can select any option. The right image is from a later round, where options you have already selected are boxed and cannot be selected again.

1st round 3rd round

There are 6 different sections, equaling out to one section per round. The breakdown of each section is below.

  • 3 letters- The score of this section is dependent on the number of valid 3 letter words you type. Each word is worth 4 points. So the score is the number of words times 4. (I.E. 3 words submitted times 4 =12 points.)
  • 4 letters- This section works the same as the 3 letter one, except every word is worth 6 points. (Getting at least 10 words in this section will add an additional 30 points to your score).
  • 5 letters- Same as previous 2, but every valid word is worth 8 points. (Getting at least 10 words in this section will add an additional 100 points to your score)
  • Full House- If have 15 words or more total you are eligible for the “Full House”, which is worth 50 points. If you get 25 words or more this will now be 150 points.
  • Flush- During the round there will be one letter that begins more words than the others-the number of words that you enter that start with this magic letter will be multiplied by 10. (If the number of words begun by 2 different letters is equal, the game will randomly select one for you.)
  • Wild- This section counts points for words you enter; the longer the word is the more points it is worth. 3 letter words are worth 1 point, 4 letters worth 2 points, and so on.

Word Poker Cheats

  • Can’t think of any words? Use this link http://www.wordfind.com/ and put your letters in the box for instant answers! Remember no proper nouns and it must be in the Neopian Dictionary (no questionable words such as trippin).
  • NO PROPER NOUNS
  • If you have an “S” available, make sure to include as many plurals as possible (Grant and Grants)
  • If you are on a later category and you have already used your 3 and 4 letter options, don’t waste time typing them, get your brain cooking up more 5 letter words! (These 3 and 4 letter words will not add points to your score)
  • If you cannot think of anymore words long before the round ends, you can end the round early by selecting the point value.
  • Every valid 7 or 8 letter word AUTOMATICALLY earns you 50 points (no selection required).
  • Neopian words count, NAMES DO NOT

Neopets Nimmo’s Pond

Nimmo’s Pond is a very frustrating, time consuming game until you get the hang of things. The goal of Nimmo’s Pond is to avoid lily pads by either shooting them or ducking out of the way. To advance to the next level, you must eliminate all the lily pads.
If you’re after the avatar, your goal is to reach 4,000 points. Now, this might seem impossible after your first play-through, but don’t you worry! With this guide, and some practice, you’ll be surpassing 4,000 points in Nimmo’s Pond in no time and maybe even adding a new trophy to your cabinet!

How to Play Nimmo’s Pond

Nimmo's Pond

Your controls consist of the up, left, and right arrow keys, your space bar, your B key, and your V key.

  • Arrow Keys: For the sake of getting the avatar (and not ripping all your hair out in frustration) pretend that you don’t have an up arrow key. All this will do is launch you into motion and keep you in motion. You cannot slow down with the down arrow key, and you cannot come to a stop. You can be stationary to get yourself that avatar so save yourself the grief if that up arrow key. Focus, instead, on your left and right keys. These keys will rotate your Nimmo so you can aim and shoot with ease, no up arrow needed!
  • Space Bar: Be ready to abuse this. This, my friends, is how you shoot and the only thing keeping those pesky lily pads from crashing into you. The faster you click, the faster your ammo comes out which will be necessary as the game progresses.
  • The B Key: B is for bomb! No, really, it is. When you use this key, it will trigger an explosion that will eliminate any lily pad closest to your Nimmo. That being said, keep these under a tight lock and key and only use them in emergencies! You can only hold three at a time!
  • The V key: This is how you catch your power ups! Your Nimmo’s tongue extends and, gulp! You’ve consumed a new power up! However the power up orb must be close by to collect, your Nimmo’s tongue can only reach so far. We’ll get more into those in the next section to get you more familiar to what helps and what doesn’t.
  • Important Reminders: The world is edge-less and wraps around. While the lily pads look like they’re flowing off screen, they reappear on the other side. Think of a treadmill, except on all four sides. And please, I cannot stress this enough; do not use your up arrow key! I don’t care how badly you want that power up!

Nimmo's Pond

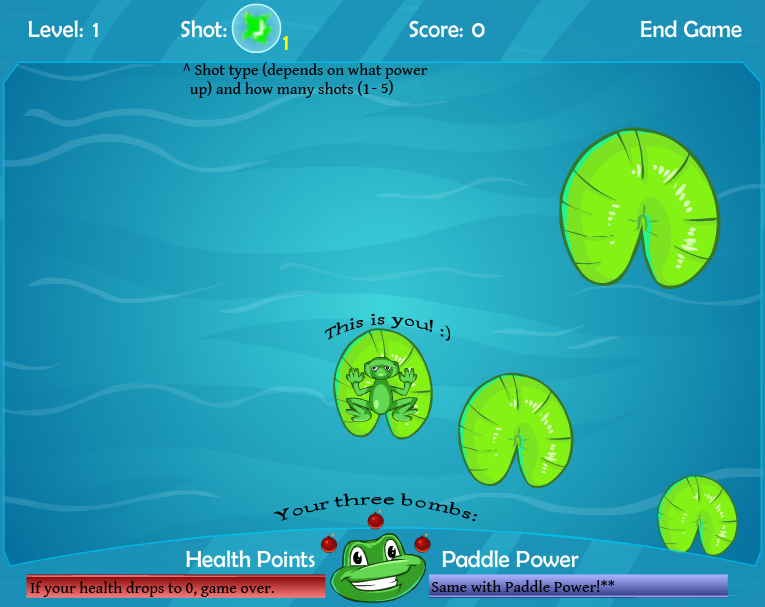
Once you hit zero Health Points or you run out of Paddle Power, the game is over.

You lose Health by being hit by a stray lily pad; the larger lilys’ doing more damage than the smaller. Health can be regained in the form of a power up, which we will cover in the next section.
Paddle Power is used when you move forward or rotate your Nimmo. You can collect power ups for Paddle Power, however it’s not necessary. **Paddle Power restores over time as your Nimmo sits still.
Your shot depends on what power up you’ve obtained, and how many you’ve obtained of them. We’ll go over this in the Power Up section, promise!

Nimmo Pond Lily Pads

This section won’t be too large, because it’s pretty self explanatory. Lily pads come in three different sizes; Large, Medium, and Small. The trick to the lily pads is (in later levels) to go after the ones that move quicker and/or moving towards you. Once those are out of the way, take down the others. Just remember that the large lily pads break down into medium, then small.
Each lily pad is valued at 10pts, so you’re looking at getting to around level 26+ to get this avatar.

Nimmo’s Pond Power Ups

Now that we’ve gotten the explanation of game play down, let’s go over power ups. Which ones are good, which are bad, and what, exactly, they stand for. Remember that this is all based on my opinion so if you feel that the power up I recommend is just not working for you, by all means try another!

NPHealth

Health:
Health power ups, obviously, increase your health. Do not collect them, however, if you have full health, as this would be a waste of a power up you might need later.

NPPP Paddle Power:
Paddle Power power ups, obviously, increase your paddle power. This is not a very necessary power up, but good if you panic about your paddle power being a bit low; not that it ever really should. However if bouncing about power ups bother you whilst playing, feel free to collect it to get it out of the way!

NPBombBomb:
The Bomb power ups replace any used bombs throughout your game. Remember how earlier I said not to use your B key unless absolutely necessary? This still applies! Even though you might luck out and get a power up, it’s still better to be safe than sorry. Also, just like health, do not collect this unless you’re low. (Or, you know, you’ve used at least one) Bombs do not stack, there are only three slots and if you collect one with a full set, you will have wasted this power up.

NPSpeed

Slow Down:
You shouldn’t need this if you’ve been following this guide. This, basically, is the only way to put on the breaks. If you’ve been staying still and avoiding that awful up button, there’s no need to collect this power up. However if it’s bouncing around and distracting you, there’s no harm in collecting it.

Ammo

NPGreenGreen:
Green is your basic shot that you start off with. It’s a good start, and fairly useful. It’s not the best when powered up to 5, but if you prefer the faster shot this is perfect for you! At the 5th power up, it shoots three rows. It’s not my favorite, but a lot of people prefer this over the other two.  (From my experience green seem to be more difficult to collect, as they’re not as abundant as the other ammo/shots and it’s important to strengthen your ammo as quickly as you can to handle later levels.)

NPYellowYellow:
This is it. This is, in my opinion, how you will get your avatar and your high score. Starting off, it shoots out three rows at a time. As you increase it, instead of increasing rows, it increases the spread of fire. The downside is the gaps in the firing, but if you get down your movements with your arrow keys this shouldn’t be a problem. If you’re not a fan of the gaps, stick with the green! (*Note; some recommend that, if you want a happy medium between green/yellow, stick with yellow on power up three. That way there’s not such a large spread.)

NPRedOrange:
Orange, red; whatever you want to call it; it is all bad. Avoid this at all costs. Not only is the range poor but it’s just… trust me, this is probably the worst shot you can have and, especially late game, will be an end game for you.

**Important Ammo Note: If you’ve leveled up your green shot, then snag a yellow, your yellow will begin at level one. So once you decide on an ammo, stick to it! You don’t want to have a weak shot in later levels!

Nimmo’s Pond Cheats

There aren’t any key phrases to enter during the game (Unlike other popular games like Ice Cream Machine or Carnival of Terror) to give you any boosts; however there are some key tips I’ve collected from other Avatar Collectors!

  • Do not move your lily pad from the center of the screen. I still cannot stress this enough! It’s hard to keep control of your lily pad while trying to shoot and avoid the other ones, especially late game.
  • If you end up using a bomb, or loosing some health before level three, I recommend ending game and starting over. Like I’ve said before, try to keep your bombs for emergencies only.
  • Once you’ve decided on your green or yellow ammo, stick to it. Switching ammo later in the game can make it almost impossible to beat, or take a heavy tole on your health bar that you might not be able to recover from.
  • There is no pause in this game. So if you’re feeling frustrated or your hand is cramping up from multiple attempts, shoot down all the fast moving lily pads and the ones heading your direction. Once you’re out of danger (for the time being) crack your wrists, take a deep breath and whisper under your breath like a crazy person, I can do this!
  • Don’t get flustered with your first few attempts. Some people are just naturally good at some games while others, it takes practice. If it takes a while that’s okay! Just take your time till you get it down. I went from getting 200 points to 2300 points in a few runs.

Nimmo’s Pond Avatar

nimmospondOnce you’ve gotten some practice runs in and gotten adjusted to the controls, go for that avatar! You should be able to get it in no time. It is a little more time consuming than some, but not nearly as difficult as others. Good luck!

Revel Roundup Neopets

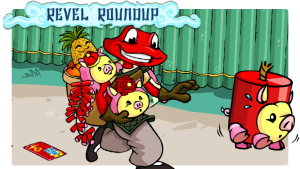
In Revel Roundup you play as Orrin, a Nimmo from the past Neopet’s Event, Cyodrake’s Gaze. Orrin is trying to prepare for the Shenkuu Lunar Festival, but unfortunately some of the costumed Snorkles have managed to escape. Your job is to save the festival by catching all the Snorkles. For every .47 points you earn in game you will earn 1 Neopoint.

Revel Roundup

Revel Roundup Basic Instructions

You will begin the game standing next to Anshu, who was a doctor in the Cyodrake’s Gaze crew. He will hand you a shopping list of items, which will be located on the left-hand side of your screen. This list will not only include Snorkles, but other various items for the festival that are left laying around the garden. If you collect an item that is not located on your list, denoted by a yellow exclamation mark above Orrin’s head, you will have to walk back to Anshu before you are able to collect the remaining correct items. Once you collect everything you will advance to the next level; there are 3 levels total in Revel Roundup. You will have 2 minutes at the start of the game, with each yellow light (on the in game circular clock in the upper left corner of your screen) representing 10 seconds. Once a light turns green, it means that you have lost that time. Beware, your clock will not fully reset at the end of each level, instead you gain back 3 yellow lights, or 30 seconds.

Revel Roundup Controls

The controls in this game cannot be any simpler, it’s the good old up down left and right arrow keys. These keys will move Orrin around the Revel Roundup map.

Roundup Items to Collect

In each of the 3 levels you will be asked to collect a certain amount of items.

  • Level 1 – 6 items
  • Level 2 – 10 items
  • Level 3 – 12 items

For every level your list will be EXACTLY half Snorkles and half festival items. There will never be any “extra” Snorkles laying around on the map in Revel Roundup, so if you see one on your list, pick it up! However there may SOMETIMES be extra festival items laying around on the map. If you spot an item on your list that is not easy to get to, blocked by another item, or just out of your way, you might consider ignoring it in hopes of finding another one in a more accessible spot.

Revel Snorkles

Royal Snorkle

Royal Snorkle           

Present Snorkle

   Present Snorkle

Firecracker Snorkle

Firecracker Snorkle

Revel Festival Items

Freeze Dried Sausage

Freezed Dried

Suasage

Golden Tangerines

Golden Tangerines

New Year Cake

New Year Cake

New Year Fire Crackers

New Year Firecrackers

New Year Yurble Dragon

New Year Yurble

Dragon

Pineapple and Oranges

Pineapple and

Oranges

Red Good Luck Packet

Red Good

Luck Packet

Steamed Dumplings

Steamed Dumplings

Steamed Round Dumplings

Round

Steamed Dumplings

Sweet and Sour Soup

Sweet and Sour

Soup

Revel Roundup Items to Avoid

Along with items to collect, there are also items you will want to avoid in Revel Roundup. These items are decoy items are there just to cause you more trouble!

Decoy Items


Pandaphant

Pandaphant


Juma

Juma

Picking up these items will cause you to lose 3 points (-3) and time while walking back to Anshu. Sometimes these items will be placed infront of you, blocking the way, and you need to decide whether it is worth the 3 point deduction and loss of time or to find an alternate path. Typically if the item is not in the same square as Anshu you would want to look for an alternative path.

Revel Roundup Scoring

Scoring in Revel Roundup is very simple. You earn 4 points for each Snorkle you recover, and all other items on your list are worth 2 points each. Picking up an incorrect item will lose you 3 points. At the end of each level you will receive a time bonus. Each yellow light left on the clock is equal to 1.3 points. The raw points (score not including time bonuses, deductions, or other level scores) is featured below.

  • Level 1 – 18 points
  • Level 2 – 30 Points
  • Level 3 – 36 points

Revel Roundup Strategies

The most efficient way to conquer Revel Roundup is to have a specific route to travel around the garden. Each user will have his own preferred method of moving, but pick one and try to stick to it. The one we are suggesting is as follows.

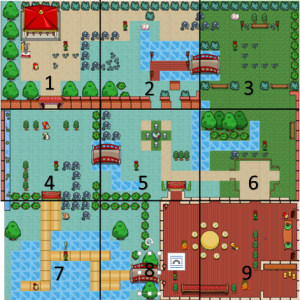
Think of the map as a grid if 9 squares labeled as such (see Map of Revel Roundup below for more details)

1 | 2 | 3
4 | 5 | 6
7 | 8 | 9

Square 1 is the top left (where you will spawn next to Anshu), square 3 is the top right, square 9 is the bottom right, and square 7 is the bottom left. We suggesting moving around the map in the following order:

1, 2, 3, 6, 9, 8, 5, 4, 7.

Of course as you learn the map you will be able to develop a path of movement that suits you best! Just remember it’s best to try and finish each map as soon as possible because you will be rewarded more points in the long run, which mean more neopoints!

Revel Roundup Cheats

  • You will never find any extra Snorkles on the map-pick them up when you see them!
  • The only petpet you will be asked to collect is the Snorkles (don’t fall for the decoys)!
  • Try to avoid incorrect items-you will lose valuable points and time for every one you collect
  • Each yellow light equals 10 seconds for a total starting time of 2 minutes
  • You will gain 3 yellow lights (3o seconds) at the start of levels 2 and 3.
  • Remember, your clock never fully resets back to the 2 minutes, best not to waste time

Revel Roundup Map

Below is a numbered and divided version of the garden map in Revel Roundup. Remember that although your shopping list and the location of the items might change, the map ALWAYS stays the same!

numbered map

Neopets Dice of Destiny

Neopets Dice of Destiny is a gambling game of numbers and chance, located in the Lost Desert. Because many elements of Dice of Destiny are randomly generated, winning is based primarily on luck. To successfully win a round of Dice of Destiny, your objective is to eliminate a series of 9 levers by rolling dice. Doing so generates a sum/number you must then “clear” away by selecting (or “pushing”) the levers which add up to the same sum generated by your dice roll.

You are limited to a specific amount of rolls that correlate to each round, an amount that gets lower and lower as you progress. Successfully completing one round will move you to the next, and there are five rounds total that must be beaten to complete the game entirely.

Between each main round, there is also potential for a bonus round if you (the player) have any unused rolls leftover from your previous main round.

Dice of Destiny

Sound confusing? Don’t worry, it’s simple once you break it down!

Dice of Destiny Controls

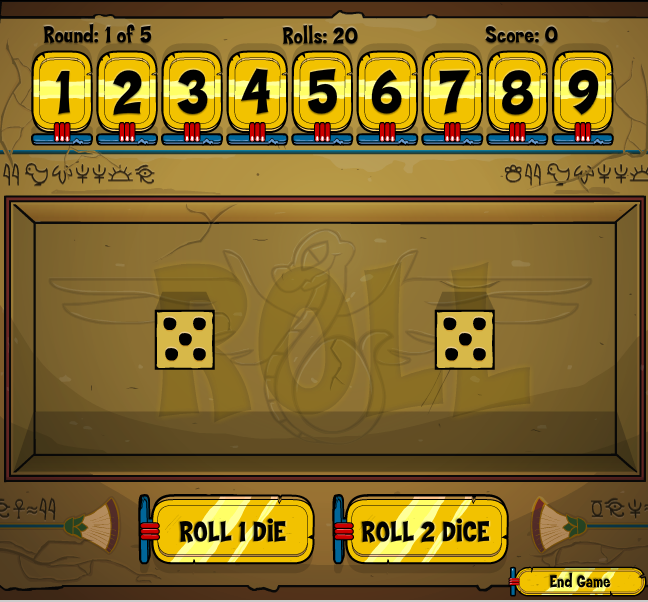
Pictured below is your game board, the screen that you will be working with throughout the entire game:

Dice of Destiny

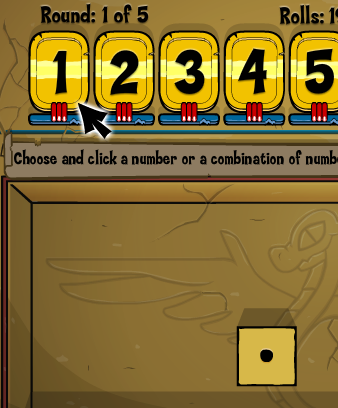
Here you can see all the main elements to interact with by clicking. The very top of the screen is where you find the levers, a series of red and blue bars each inscribed with the numbers 1 through 9. Below this, you will see the area to roll your dice- you have the option to roll either one or two dice, which is determined by selecting and clicking on the appropriate button located at the bottom of your screen. This is also where your end game button is located, should you decide to end your game early.

Playing a Dice of Destiny Round

To begin your round, make your selection and roll either one or two dice. This will randomly generate two numbers, and the sum of these numbers will determine what lever(s) you can clear away. Any combination of levers that add up to the sum of the dice is fair game for clearing.

Say, for example, that you choose to roll two dice, and you receive a [3] and a [2]. This would give you a sum of 5, as 3 + 2 = 5. This means that you can clear away any levers that equal 5, giving you the following options:

  • The lever 5
  • The lever 4 and the lever 1
  • The lever 3 and the lever 2

Because all of these combinations add up to 5, they are all valid selections for that particular roll. In general, you want to clear as many levers as possible in a single turn, so it is best to choose the options that involve the most amount of levers. In this case, it would be the options involving 4 and 1, or 3 and 2.

Dice of Destiny Rolls

There is no time limit to each round, but there is a limit to the amount of dice rolls you are allowed to attempt. This limit changes with each round, becoming slightly less with each progressing stage, in order to increase the game’s challenge.

In your first round, you are given 20 rolls, which allows for 20 tries to clear away all the levers.

In round two, you are given 17 rolls.

In round three, 15 rolls.

Round four, 12 rolls.

And round five, the final round, allows you only 10 rolls.

This is important because in order to successfully move from one round to the next, you MUST clear away all nine levers before you run out of rolls. Being unsuccessful in doing so will end the game at whatever level you did not clear in the allocated amount of tries.

Dice of Destiny Scoring System

For each lever that is successfully cleared away within a round, you are awarded 10 points. Once all levers are cleared, you are then awarded an additional 10 points before being moved on to the next round. If you manage to clear away all the levers while having additional rolls leftover (for example, if you successfully clear away all 9 levers in round three, and it only takes you 10 of your 15 rolls, you will then have 5 “leftovers”) then instead of being moved directly to the next round, you will enter a bonus round.

In this bonus round, the amount of rolls you are allowed to attempt is equal to your amount of leftover rolls. The round is played with special dice that will award you additional points according to the symbols inscribed on their faces. The symbols and their values are as follows:

  • ”tep”, a pair of green dice, worth 10 points
  •     ”saf”, a pair of yellow dice, worth 5 points
  •    “djo”, a pair of red dice, worth -10 points

Obviously, it is ideal to roll either tep or saf, as rolling djo will subtract from your total points. But you should try to earn as many bonus rounds as possible by clearing away main-round levers in as few rolls as possible, because netting bonus rounds will almost always result in a higher score than not having any bonus rounds at all…. even if you unfortunately encounter a pair of djo dice.

In every bonus round, in order to receive the point addition or subtraction, both dice sides must match. If you roll two differently colored symbols, you will not receive or lose any bonus points for that roll. So getting a bonus round doesn’t necessarily guarantee any extra points, it merely gives you a chance at them!

Dice of Destiny Cheats

There are no official site cheats incorporated into the Dice of Destiny game, but there are outside strategies that can be used to increase your chances of successfully clearing rounds.

  • The Pyramid of Combinations: This is a comprehensive list of every possible dice roll sum (the first number) and its corresponding lever options (the numbers that follow). This can be used to determine what would be the most effective use of your roll, and which selections eliminate the most levers:

1 : 1

2 : 1 | 1 & 2

3 : 1 | 2 & 3

4 : 1 | 4 & 2 | 2 & 4

5 : 1 | 4 & 3 | 2 & 5

6 : 1 | 5 & 2 | 4 & 3 | 3 & 6

7 : 1 | 6 & 2 | 5 & 3 | 4 & 7

8 : 1 | 7 & 2 | 6 & 3 | 5 & 4 | 4 & 8

9 : 1 | 8 & 2 | 7 & 3 | 6 & 4 | 5 & 9

10 : 1 | 9 & 2 | 8 & 3 | 7 & 4 | 6 & 5 | 5 & 10

11 : 1 | 10 & 2 | 9 & 3 | 8 & 4 | 7 & 5 | 6 & 11

12 : 1 | 11 & 2 | 10 & 3 | 9 & 4 | 8 & 5 | 7 & 6 | 6 & 12

  • The Higher Numbers Trick: When at all possible, try to eliminate the higher numbered levers first. This gives a slight advantage because there are more combinations available with lower numbers, while higher numbers require specific rolls that might be less likely to occur as you draw closer to your allocated roll limit.
  • The Black Arrow Trick: If you are ever in the middle of a round and get really, really stuck, idling long enough without clicking or making a move will cause a black arrow to appear on screen. This arrow will point out any possible levers available for you to click. While the arrow does not necessarily point out smartest move, it will always point out a legitimate move, so if you truly find yourself in a bind you can simply wait it out and let the game pick the levers for you. 🙂

In closing, while the sheer amount of random elements in this game might make it seem daunting, the fact of the matter is that it’s one of the few “luck and chance” related games in Neopia that does not have any base fee to play- in other words, it’s completely free! So while you might not be able to master it through skill, it’s worth giving a play anyway as every successful game will net you 100% profit no matter how much you win. And because there is no initial cost, there is quite literally nothing to lose from an unsuccessful game.

So go ahead and knock on wood, cross your fingers, and roll those dice… hope you’re feeling lucky!