Neopets Dice of Destiny

Neopets Dice of Destiny is a gambling game of numbers and chance, located in the Lost Desert. Because many elements of Dice of Destiny are randomly generated, winning is based primarily on luck. To successfully win a round of Dice of Destiny, your objective is to eliminate a series of 9 levers by rolling dice. Doing so generates a sum/number you must then “clear” away by selecting (or “pushing”) the levers which add up to the same sum generated by your dice roll.

You are limited to a specific amount of rolls that correlate to each round, an amount that gets lower and lower as you progress. Successfully completing one round will move you to the next, and there are five rounds total that must be beaten to complete the game entirely.

Between each main round, there is also potential for a bonus round if you (the player) have any unused rolls leftover from your previous main round.

Dice of Destiny

Sound confusing? Don’t worry, it’s simple once you break it down!

Dice of Destiny Controls

Pictured below is your game board, the screen that you will be working with throughout the entire game:

Dice of Destiny

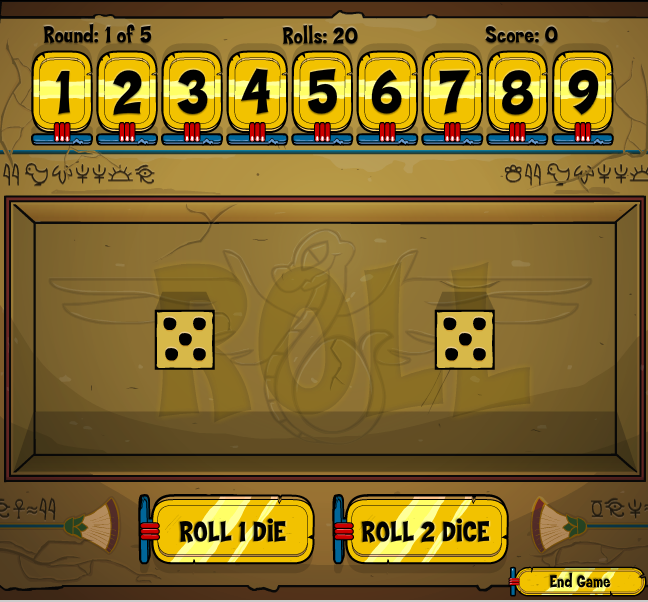
Here you can see all the main elements to interact with by clicking. The very top of the screen is where you find the levers, a series of red and blue bars each inscribed with the numbers 1 through 9. Below this, you will see the area to roll your dice- you have the option to roll either one or two dice, which is determined by selecting and clicking on the appropriate button located at the bottom of your screen. This is also where your end game button is located, should you decide to end your game early.

Playing a Dice of Destiny Round

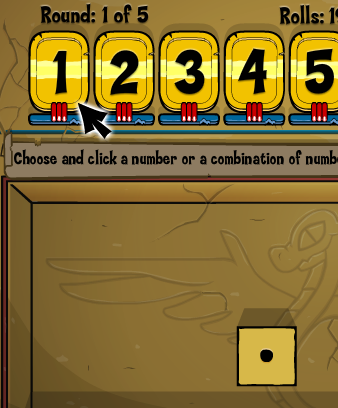
To begin your round, make your selection and roll either one or two dice. This will randomly generate two numbers, and the sum of these numbers will determine what lever(s) you can clear away. Any combination of levers that add up to the sum of the dice is fair game for clearing.

Say, for example, that you choose to roll two dice, and you receive a [3] and a [2]. This would give you a sum of 5, as 3 + 2 = 5. This means that you can clear away any levers that equal 5, giving you the following options:

  • The lever 5
  • The lever 4 and the lever 1
  • The lever 3 and the lever 2

Because all of these combinations add up to 5, they are all valid selections for that particular roll. In general, you want to clear as many levers as possible in a single turn, so it is best to choose the options that involve the most amount of levers. In this case, it would be the options involving 4 and 1, or 3 and 2.

Dice of Destiny Rolls

There is no time limit to each round, but there is a limit to the amount of dice rolls you are allowed to attempt. This limit changes with each round, becoming slightly less with each progressing stage, in order to increase the game’s challenge.

In your first round, you are given 20 rolls, which allows for 20 tries to clear away all the levers.

In round two, you are given 17 rolls.

In round three, 15 rolls.

Round four, 12 rolls.

And round five, the final round, allows you only 10 rolls.

This is important because in order to successfully move from one round to the next, you MUST clear away all nine levers before you run out of rolls. Being unsuccessful in doing so will end the game at whatever level you did not clear in the allocated amount of tries.

Dice of Destiny Scoring System

For each lever that is successfully cleared away within a round, you are awarded 10 points. Once all levers are cleared, you are then awarded an additional 10 points before being moved on to the next round. If you manage to clear away all the levers while having additional rolls leftover (for example, if you successfully clear away all 9 levers in round three, and it only takes you 10 of your 15 rolls, you will then have 5 “leftovers”) then instead of being moved directly to the next round, you will enter a bonus round.

In this bonus round, the amount of rolls you are allowed to attempt is equal to your amount of leftover rolls. The round is played with special dice that will award you additional points according to the symbols inscribed on their faces. The symbols and their values are as follows:

  • ”tep”, a pair of green dice, worth 10 points
  •     ”saf”, a pair of yellow dice, worth 5 points
  •    “djo”, a pair of red dice, worth -10 points

Obviously, it is ideal to roll either tep or saf, as rolling djo will subtract from your total points. But you should try to earn as many bonus rounds as possible by clearing away main-round levers in as few rolls as possible, because netting bonus rounds will almost always result in a higher score than not having any bonus rounds at all…. even if you unfortunately encounter a pair of djo dice.

In every bonus round, in order to receive the point addition or subtraction, both dice sides must match. If you roll two differently colored symbols, you will not receive or lose any bonus points for that roll. So getting a bonus round doesn’t necessarily guarantee any extra points, it merely gives you a chance at them!

Dice of Destiny Cheats

There are no official site cheats incorporated into the Dice of Destiny game, but there are outside strategies that can be used to increase your chances of successfully clearing rounds.

  • The Pyramid of Combinations: This is a comprehensive list of every possible dice roll sum (the first number) and its corresponding lever options (the numbers that follow). This can be used to determine what would be the most effective use of your roll, and which selections eliminate the most levers:

1 : 1

2 : 1 | 1 & 2

3 : 1 | 2 & 3

4 : 1 | 4 & 2 | 2 & 4

5 : 1 | 4 & 3 | 2 & 5

6 : 1 | 5 & 2 | 4 & 3 | 3 & 6

7 : 1 | 6 & 2 | 5 & 3 | 4 & 7

8 : 1 | 7 & 2 | 6 & 3 | 5 & 4 | 4 & 8

9 : 1 | 8 & 2 | 7 & 3 | 6 & 4 | 5 & 9

10 : 1 | 9 & 2 | 8 & 3 | 7 & 4 | 6 & 5 | 5 & 10

11 : 1 | 10 & 2 | 9 & 3 | 8 & 4 | 7 & 5 | 6 & 11

12 : 1 | 11 & 2 | 10 & 3 | 9 & 4 | 8 & 5 | 7 & 6 | 6 & 12

  • The Higher Numbers Trick: When at all possible, try to eliminate the higher numbered levers first. This gives a slight advantage because there are more combinations available with lower numbers, while higher numbers require specific rolls that might be less likely to occur as you draw closer to your allocated roll limit.
  • The Black Arrow Trick: If you are ever in the middle of a round and get really, really stuck, idling long enough without clicking or making a move will cause a black arrow to appear on screen. This arrow will point out any possible levers available for you to click. While the arrow does not necessarily point out smartest move, it will always point out a legitimate move, so if you truly find yourself in a bind you can simply wait it out and let the game pick the levers for you. 🙂

In closing, while the sheer amount of random elements in this game might make it seem daunting, the fact of the matter is that it’s one of the few “luck and chance” related games in Neopia that does not have any base fee to play- in other words, it’s completely free! So while you might not be able to master it through skill, it’s worth giving a play anyway as every successful game will net you 100% profit no matter how much you win. And because there is no initial cost, there is quite literally nothing to lose from an unsuccessful game.

So go ahead and knock on wood, cross your fingers, and roll those dice… hope you’re feeling lucky!

Last updated: 12/18/2024

Neopets Pick Your Own

Neopets Pick Your own is a simple point-and-click exploration game located in the land of Merridel. Pick Your Own is available to play once per day, and will cost 400 neopoints per game. Paying this fee gives you access to a punnet (aka basket) which can hold up to 6 items that you may come across when clicking around the fields. By playing Pick Your Own, you have the chance to receive a variety of items as well as the opportunity to earn a secret avatar. There is no time limit on how long you can spend in the fields, but you ARE limited to 20 clicks before your time is up and the game will end. Whatever you have in your basket at that point is yours to keep, so it’s important to gather wisely!

Neopets Pick Your Own

Pick Your Own Instructions

The goal of this game is to fill your basket with berries before you run out of exploration clicks.The game itself is mostly randomized, involving a basic map which shows different areas of the farm available to “explore” (click on) in order to scavenge for berries. When exploring the map, the images that show are randomly generated, and sometimes the same picture will be repeated, so pay careful attention to when you click the navigational arrows. This ensures that you are clicking on a new area each time.

Gathering In Pick Your Own

To gather an item, all you have to do is click anywhere inside of the image:

Pick your Own Neopets

This will either bring you to a page where you find a berry, a non-berry item, or nothing at all. If an item IS found, it will automatically be added to your basket. With my first click, I found a boot, which is shown above the map and also added into my basket. You are also then given a button to leave the farm and end the game at any point, moving forward. I would not recommend this as there is nothing to gain by ending a game early… but if for some reason you need to, the option is now available.

Next, click one of the navigational arrows and repeat these steps in a new area in order to gather more items:

Pick your own neopets daily

Here, you can see I found a half-eaten berry. At this point, I may decide that I no longer want the boot, and do not want it taking up a slot in my basket in case I find something better. In order to get rid of the boot, I simply click on it in my basket. This will cause a pop-up alert on your browser (so make sure pop-ups are enabled!) that will display the confirmation message: Are you sure you wish to discard [item]? You have the option to select [yes] or [no], and this gives you a chance to back out if you change your mind. I was certain, however, that I did not want this boot and so I proceeded to confirm the discard:

4-9895762

You can see that I am still in the same area of the farm, but the boot is no longer in my basket. Discarding items does NOT count against you as one of your exploration clicks! Sometimes, you will click an area of the map and not find anything at all. In this case, the following message will display:

5-3560695

Even though you do not gain any berries or items into your basket, this click DOES still count as one of your allocated 20 movements. Moving back to an area you already visited, likewise, will also count, and exploring an area where you already found a berry or other item will return this “nothing found” message. This is why it is important to keep track of where you have already been- going around in circles can easily waste clicks!

Ending A Pick Your Own Game

Once you have exceeded your 20 clicks, you will be automatically navigated to the end-game screen, where you are shown everything that you have collected and can potentially take with you:

6-9842840

In my case, I did not have enough berries to fill the basket before I ran out of clicks. Even though the game is over, you still have the option to click and discard items from your basket if you would like to. Honestly, there is not much benefit to this as junk items can easily be sold, donated, or discarded from your own inventory.

If you are satisfied with your basket’s contents, then simply click the button to collect berries and leave farm, thus completing your Meri Acres adventure. 🙂

In closing, there is generally not much profit to be made with this game- it is possible to find expensive berries, but they are very rare and require a lot of luck to discover. However, gathering berries is a quick way to get a decent amount of junk items or food to feed your neopets, so for some it may be worth the fee.

Pick Your Own Avatar

For avatar collectors, there is also an associated secret avatar that can be won:

pickyourown-2211407

The process is fairly simple but, again, requires a little bit of luck! In order to earn this particular avatar, you must leave the farm (either by ending the game or using up all your clicks) with 6 non-dung items inside of your basket. The best way to increase your odds at this is to discard each piece of dung as you find it, don’t wait until the end! This maximizes your chances of filling your slots with berries or (non-dung) junk items by freeing up slots as soon as possible.

Pick Your Own Prizes

The below images are a visual reference to all the items that can possibly be obtained from the farm, divided into “berries” and “non-berries” (the clover items are only available annually on the special holiday March 17… St. Patrick’s Day!). Feel free to use these charts in order to cross reference what you may or may not want to keep:

7-1384020

8-6595533

Pick Your Own Cheats

Though there are no legitimate cheat codes intentionally put into the Pick Your Own game, there are a few tricks that one can try in order to gain certain advantages.

caption_791-9328929

  • Pick Your Own ignores the neopets inventory limit, so even if you are carrying your maximum 50 items, everything in your basket that you end the game with will still be added to your inventory- this makes it possible to carry over 50 items with you around the site.
  • It is sometimes possible to receive more than 6 items in your basket by spam-clicking a single area of the map over and over again without touching the arrows. The extra items will not display in your basket, but when you end the game they will appear in your inventory. It’s also possible that you might not get extra items and end your game prematurely, so use with caution.

Is Pick Your Own Worth It?

“Pick Your Own” on Meri Acres Farm can be a fun and engaging daily activity in Neopets, offering a unique way to spend Neopoints while collecting random items. However, whether it is truly “worth it” depends on what you are hoping to achieve.

The Pros:

  1. Random Rewards: Each time you pick, you receive a random selection of items, some of which can be valuable or rare. Players have reported finding useful items such as books, seeds, or even rare collectibles.
  2. Daily Fun: If you’re looking for a daily activity to break up your routine, “Pick Your Own” can be a fun distraction, as it’s always a surprise what you will receive.
  3. Chance for Rare Finds: There is always a possibility of picking up something rare or valuable, making the activity enticing for collectors and those who enjoy the thrill of chance.

The Cons:

  1. High Cost: At 400 Neopoints per attempt, the cost of picking can add up quickly. Many players find that after multiple tries, they are left with common, low-value items that don’t justify the expense.
  2. Unpredictable Results: While some items are useful, others can be completely useless, cluttering your inventory with things that aren’t worth much. The randomness can be frustrating for players seeking more control over their Neopoint spending.
  3. Limited Value for Neopoint Efficiency: If you are trying to maximize your Neopoint income or build wealth, “Pick Your Own” might not be the most efficient use of your resources. Unlike other activities, like battling or investing in stocks, it doesn’t offer guaranteed or steady returns.

If you enjoy the thrill of randomness and don’t mind the potential waste of Neopoints, “Pick Your Own” can be a fun and light-hearted activity. However, if you are looking to maximize your Neopoint earnings or acquire highly valuable items, you may find that the activity doesn’t always provide the best return on investment. Ultimately, it’s up to you to decide whether the fun of unpredictability is worth the cost.

Best of luck, and happy picking!

Last updated: 12/15/2024

Poogle Racing Neopets

Poogle Racing on Neopets is a widely loved activity for the residents of Faerieland– and it can be for you too, if you choose to participate! Poogle Racing is similar to its real life counterpart, pig racing. Thus, it is not difficult at all to play. All you need to do is make a bet and cheer on your chosen Poogle!

Introduction to Poogle Racing

Firstly, it is important to note that Poogle Racing does not happen whenever you want it to. Races are started every 15 minutes, so therefore, there will be a race at :00, :15, :30, and :45 past the hour.

The Poogles

Poogle Racing  Poogle 1: Poogle 1 is a fan favorite, as it tends to win a lot of races. He keeps up with the rest of the Poogles, but slows down during the end of the race and does not accelerate over hurdles like the rest of the contenders do. Many people like to feed him fresh foods to keep him going, but remember that luck has to be on your side regardless! He is quick and agile, which means he has the lowest odds out of the rest of the Poogles. However, just because of these tips, he isn’t guaranteed to win at all. If it’s your first time and you haven’t chosen a personal favorite, this is probably the choice for you! Odds- 3:1

poogle2 Poogle 2: My personal favorite, Poogle 2 is able to push ahead like Poogle 1, but does not tire out as easily. This Poogle has good speed and endurance and is fast to jump over the hurdles. He can get distracted by cheering and food, so try not to feed him or cheer! It may seem cruel, but maybe he just likes to focus! This Poogle’s odds are decent, meaning that he can potentially win any race. It is recommended to bet on this Poogle if you want a fair chance of winning NP from the races. Odds- 4:1

poogle3 Poogle 3: Poogle 3 always runs fairly quickly, enough to get him into second or third place almost every time. Unlike Poogle 2, this guy benefits from lots of food and encouragement. Don’t hold back on cheering for him- he loves it! He’s slow on acceleration, but once he gets more into the races, he runs quickly. He usually loses all his speed on the jump, but if you cheer enough he can sometimes just go fast enough to win. If you have the time to cheer on this Poogle and can provide encouragement, he is a solid pick. Odds- 5:1

poogle4 Poogle 4: Poogle 4 is getting old- that much is obvious. He isn’t as fast as he probably was in his “glory days”, but he still occasionally wins! Don’t bet on Poogle 4 if you’re looking for a decent chance at a win, however. Just because he has a chance doesn’t mean it’s a good one! He’s generally slow to run and slow to accelerate, and very clumsy over hurdles. Support your elders day? You’re in luck! Odds- 7:1

poogle5 Poogle 5: …. … .. mmph? Huh? Did you say something? Oh yeah, Poogle 5. That one. Poogle 5 doesn’t have the word “exercise” in his dictionary, and it really shows! He’s the outlier of the rest of the contestants, and you’d have to be crazy to bet on him. Sure, he may win once in a while, but his losses overshadow his wins completely. Huh.. where is he going? Back to his nap? Yeah, that tells a lot….. Odds- 9:1

Poogle Race Betting

You can start to bet on your chosen Poogle ten minutes before the race starts. If your internet connection isn’t the best, it is advisable to bet a few minutes before the race starts rather than sooner. If the race starts and your bet doesn’t go through in time, you’ll lose your Neopoints! When you’ve made your decision of who to support, click the Go to Betting Page button.

Poogle Racing

On the betting screen, you will have the option to choose a Poogle from a list of 5. Based on the list prior to this, you should have chosen a Poogle from the list. Although some may have better odds, it is ultimately your own choice, since they all have a chance.

pooglebetting

Your first button, Pick-a-Poogle, is where you can choose your Poogle. The next box allows you to leave a bet, up to 300 NP. The final dropdown menu allows you to choose from 3 foods in your inventory to give the Poogle. These treats are said to help your Poogle run faster.

The Poogle Race

Now that you’ve placed your bet, it’s time to wait for the race! Exit out of the bookkeeper and refresh until the time comes for the race to start! Don’t worry if your connection is slow- you can still view a re-run of the race 5 minutes after it starts.

Poogle Racing Neopets

And they’re off! This is the race screen, after a few sport-like cutscenes are shown. You can also opt out of hearing the sound effects for a faster loading screen.

Let’s take a look at all the buttons on your screen. On top, there are indicators of which Poogle is in first, second, third, fourth, or fifth. It isn’t too important to pay attention to these unless two of the Poogles are very close together, as shown on the example screen. To the right of these indicators, you can view the time in seconds and distance in meters.

Underneath the screen are the buttons that you can interact with, the cheer buttons! As you would imagine, it is only recommended to cheer for the Poogle you chose. What’s the use in cheering on their opponent to win? Technically, the cheering buttons don’t do anything, as the races are predetermined (come on Neopets, rigging your races too?), but if you want to cheer for luck, go for it!

Once the Poogles are done racing, the winner will stand up and dance, and the screen will cut to the trophy screen.

neopets Poogle Racing

The winning Poogle will be standing on top, with the second-place Poogle to his left, and the third place Poogle to his right. Don’t let the numbers on the pedestals fool you! These are the numbers of the Poogles themselves, not the places that they came in.

If your Poogle didn’t win, don’t be discouraged, there’s another race in 15 minutes! It’s purely based on luck. If they did, congrats! Click the button below the race to collect your earnings from the Scorchio. If you don’t feel like watching the whole race, you can also click this button before the race starts and collect your earnings that way.

Poogle Racing Avatar

pooglewinner It is possible to win an avatar from the races. You get this avatar if your Poogle wins.

Neopets Petpet Plunge

Neopets Petpet Plunge is a game where you play as a Maraquan Petpet, diving down under the ocean to find various treasures! In Petpet Plunge, you only use your mouse, making this game much easier to coordinate. If you’re used to being confused with popular but difficult games, have no fear! Petpet Plunge is very relaxing to play.

 Petpet Plunge

Petpet Plunge Controls

As previously mentioned, Petpet Plunge has very simple controls- you only need a mouse! In order to move your Petpet, left-click, hold, and drag your cursor in whatever direction you want to move. The further you drag the gold arrow , the faster your Petpet will go. Make sure that you know how fast the character will go before you drag the arrow! The arrow size determines how far your Petpet will go – a small arrow equals a small plunge, and a larger arrow will take your Petpet further. It may not be the easiest to judge at first, but once you start playing, you’ll get used to it.

Also remember that you only get 4 moves per level, so try to conserve them if you can!

Bonus Levels in Petpet Plunge

Eventually, small whirlpools will appear. Don’t avoid these! The whirlpools are essentially portals to new areas, and in this case, bonus levels. You have one move to collect a bunch of items in the bonus levels, so plan accordingly. Don’t get frustrated if you can’t complete them perfectly.

The Items

Now that you’ve familiarized yourselves with the controls, it’s time to learn about the items you will need to collect! Keep in mind that some of the “obstacles” can also serve as benefits, based on where they’re placed. Use your own judgement! An interesting aspect of the items is that they are not complicated at all, so remembering what each one does isn’t necessary except for on a basic level. This is a great game to play if you just want to relax.

Shells

These shells are necessary to collect. Missing only one will warrant a quick Game Over! There will likely be many on the screen, scattered over a large area.

game_petpetplunge2 Blue Shell This basic shell will stop appearing after Level 4, except for in “Bonus Levels”.
game_petpetplunge3Yellow Shell Like the Blue Shell, this also stops appearing after Level 4. It does not reappear in Bonus Levels.
game_petpetplunge4Sand Dollar The Sand Dollar begins to appear in Level 5, after the disappearance of the first two shells. It stops appearing in Level 8, except for one Bonus Level.
game_petpetplunge5Green Spotted Shell These shells appear in the same levels as the Sand Dollar, except they do not appear in any bonus levels.
game_petpetplunge6Purple Shell Appears in levels nine to twelve.
game_petpetplunge7Light Purple Shell Only appears in levels nine and eleven.

Along with the shells, there are also speed boosts and bonuses that you can pick up! These are also necessary to collect, with the exception of the clamshell. However, just because the clamshell isn’t necessary, doesn’t mean you shouldn’t get it! It’s probably the most useful item, granting you an extra move.

game_petpetplunge8Pink Shell While also gaining you points, the Pink Shell gives your Petpet a speed boost. It comes in handy when your shots are limited. The Pink Shell appears in levels one to four, and two of the bonus levels.
game_petpetplunge10Teal and Yellow Shell The Teal and Yellow Shell appears in levels five to eight and one bonus level. Like the Pink Shell, it also offers a speed boost.
game_petpetplunge9Purple Circle Shell The Purple Circle Shell appears last, in Levels nine to twelve.
game_petpetplunge11Maractite Chunk This chunk of aquatic gemstone will remove the property of friction for a short period of time, allowing you to glide at a constant speed.
game_petpetplunge12Clam Shell The Clam Shell is possibly the most useful item in the game, and a real life saver. If you collect the pearl inside, you get an extra, free shot! However, make sure to only launch your Petpet at it when it is open. If the shell is closed, your Petpet could get stuck inside!

Obstacles

Didn’t think it would be that easy, did you? Unfortunately, there are also obstacles to avoid. The following are bumper bubbles, which allow you to bounce off of them. (Note: Even though these are categorized as “obstacles”, they can also be used to your benefit in some situations. Don’t avoid them unless you know you have to!)

game_petpetplunge13Blue Bubble This bubble is fairly weak, and it only takes one hit to break. Be sure to use it when you need it only!
game_petpetplunge14Green Flame Bubble The green, fancy-looking bubble is stronger than the Blue Bubble. It takes 3 hits to break, and offers a speed boost once you bounce off of it.
game_petpetplunge15Orange Bubble These bubbles don’t pop at all! The orange bubble can be used as many times as you want.

Along with the bubbles, there are also “enemy” Petpets who attempt to make you stray from your goal. These pets should be avoided! However, don’t worry if you accidentally hit one. You won’t lose a shot, but you will be redirected from your target.

In certain cases, these Petpets will offer benefits, but not always. Just assess your situation.

game_petpetplunge16Arkmite Appears in levels six, ten and twelve.
game_petpetplunge17Ghoti Appears in levels seven and eleven.
game_petpetplunge18Darpinch Only appears in level nine.

Petpet Plunge Cheats and Tips

  • Use plans to map out your moves! You can hold something to use as a straight edge (e.g. paper, hand, pencil) up to the screen in order to better calculate the direction that your shots will need to go.
  • Don’t worry if you can’t finish the level in one move! It’s not very easy to do, and is the reason why multiple lives are allowed. Just try again and don’t get frustrated!
  • The water effects certainly look cool, but will probably slow down your game unless your internet is quite good. I would recommend turning them off.
  • Although this game will get frustrating after a while, don’t give up! It’s not time-based, so spend some time working out where you need to go and how the environment will react to your shots.
Last updated: 12/18/2024

Neopets Petpetsitter

Neopets Petpetsitter is a reaction-based game where your goal is to help solve the problems of a Petpet. Many feel that Petpetsitter is a somewhat pointless game, but doing it daily can help you earn easy Neopoints. You will benefit from having fast fingers and a quick reaction speed in order to play Petpetsitter easily.

Petpetsitter

Petpetsitter Game Guide

Petpetsitter really isn’t a complicated game at all, and is quite easy to understand. Before you start playing, it is essential to familiarize yourself with the different parts of the house. These parts are:

Kitchen: Left side of the house

Outside: Upper left of the house

Garage: Middle upper part of the house

Bedroom: Upper right side of the house

Bathroom: Right side of the house

Each one of these areas is represented with a door or doorway that leads into the room. After you make sure you know where each of the rooms are, it’s time to learn about gameplay mechanics! You will start the game with a Petpet in the common room, walking around. Eventually, this Petpet will have a “need“, something that you need to let it do. Don’t take too long to fulfill its needs, though! You have a limited time to bring it to the proper room.

The following is a list of the needs that your Petpet might have, and how to remedy them. Pay attention to the pictures and sounds that your Petpet makes!

game_petpetsitter1 Hungry for Satisfaction of Hunger This means that your Petpet is hungry! Bring them to the kitchen in order to satisfy their hunger.
game_petpetsitter2 Hungry for Something to Do Your Petpet is bored! Why don’t you let them outside?
game_petpetsitter3 Hungry for Repairs It’s broken, whatever it is… take it to the garage to repair it!
game_petpetsitter4 Hungry for Sleep This Petpet is sleepy! Let it take a nap in the bedroom.
game_petpetsitter5 Hungry for Urination Your Petpet needs to pee! Take it to the bathroom!

Petpetsitter Messes

Along with having needs, your Petpet can also make 5 different types of messes. You should have trained this thing better! If your Petpet makes one of the following messes, clean it up with the mop.

  • Broken flower pot
  • Urine on the floor
  • Milk bottles knocked over
  • Robotic Petpet leaves oil on the floor
  • Bucket knocked over

It is important to clean up these messes, because if your Petpet runs over one of the messes, you will lose 5 points. However, if you clean them up, you gain 10 points!

You can prevent oil from leaking onto your floor by bringing your Robotic Petpet to the garage in time, and prevent urine from leaking onto the floor by bringing your Petpet to the bathroom.

Petpetsitter Scoring Guide

  • -5: Petpet hits a pot, milk bottle, or bucket.
  • +10: Cleaning up after a mess is made from one of the 3 containers.
  • +10: Solving a Petpet’s problem.
  • +10: Clean up after a Petpet’s problem (urine or oil).
  • -1 Life: Go past the time limit on solving a problem.

Petpetsitter Cheats and Tips

  • Type in “oscillabot” at any point while playing to get an extra life, once per game.
  • Pay attention to the sounds that your Petpets are making!
  • Don’t take your time, it’s precious!
  • Try to memorize each of the “needs” positions.

Petpetsitter Trophies

Gold, silver, and bronze trophies are awarded for certain minimum scores.

428_3 Bronze
428_2 Silver
428_1 Gold

Petpetsitter Avatar

There is an avatar available if you get at least 2500 points. It is called “Petpetsitter“.

Petpetsitter

Last updated: 12/22/2024